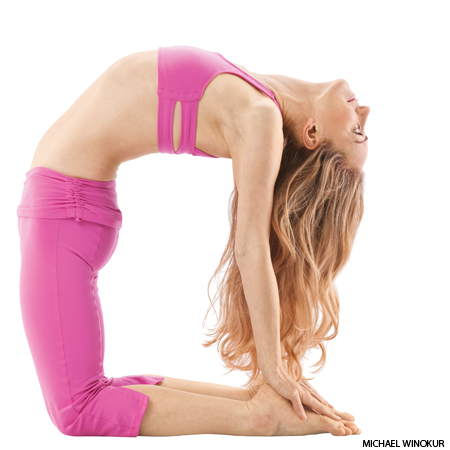
Camel Pose
Equipment: no equipment
Fitness level: beginner
Category: Yoga
(oosh-TRAHS-anna)
ustra = camel
Step-by-Step Instructions
- Kneel on the floor with your knees hip width and thighs perpendicular to the floor. Rotate your thighs inward slightly, narrow your hip points, and firm but don’t harden your buttocks. Imagine that you’re drawing your sitting bones up, into your torso. Keep your outer hips as soft as possible. Press your shins and the tops of your feet firmly into floor.
- Rest your hands on the back of your pelvis, bases of the palms on the tops of the buttocks, fingers pointing down. Use your hands to spread the back pelvis and lengthen it down through your tail bone. Then lightly firm the tail forward, toward the pubis. Make sure though that your front groins don’t “puff” forward. To prevent this, press your front thighs back, countering the forward action of your tail. Inhale and lift your heart by pressing the shoulder blades against your back ribs.
- Now lean back against the firmness of the tail bone and shoulder blades. For the time being keep your head up, chin near the sternum, and your hands on the pelvis. Beginners probably won’t be able to drop straight back into this pose, touching the hands to the feet simultaneously while keeping the thighs perpendicular to the floor. If you need to, tilt the thighs back a little from the perpendicular and minimally twist to one side to get one hand on the same-side foot. Then press your thighs back to perpendicular, turn your torso back to neutral, and touch the second hand to its foot. If you’re not able to touch your feet without compressing your lower back, turn your toes under and elevate your heels.
- See that your lower front ribs aren’t protruding sharply toward the ceiling, which hardens the belly and compresses the lower back. Release the front ribs and lift the front of the pelvis up, toward the ribs. Then lift the lower back ribs away from the pelvis to keep the lower spine as long as possible. Press your palms firmly against your soles (or heels), with the bases of the palms on the heels and the fingers pointing toward the toes. Turn your arms outwardly so the elbow creases face forward, without squeezing the shoulder blades together. You can keep your neck in a relatively neutral position, neither flexed nor extended, or drop your head back. But be careful not to strain your neck and harden your throat.
- Stay in this pose anywhere from 30 seconds to a minute. To exit, bring your hands onto the front of your pelvis, at the hip points. Inhale and lift the head and torso up by pushing the hip points down, toward the floor. If your head is back, lead with your heart to come up, not by jutting the chin toward the ceiling and leading with your brain. Rest in Child’s Pose for a few breaths.
POSE INFORMATIONSanskrit NameUstrasana
Contraindications and Cautions- High or low blood pressure
- Migraine
- Insomnia
- Serious low back or neck injury
Modifications and PropsUstrasana can be a very difficult pose for the neck, especially if your shoulders are tight. You can use a wall as a prop to protect your neck. Prepare for the pose with your back to a wall, with your toes turned under and your soles as close to the wall as possible. Exhale and lean back, as described in step 3 in the main description above. Press the crown of your head into the wall and, against this pressure, lift the shoulder blades deeper into your back. Keep your hands on your pelvis or swing them back to press your palms against the wall.
Deepen the PoseYou can increase the challenge of Ustrasana by performing the pose with your thighs, calves, and inner feet touching.
Theraputic Applications- Respiratory ailments
- Mild backache
- Fatigue
- Anxiety
- Menstrual discomfort
Preparatory Poses- Bhujangasana
- Dhanurasana
- Salabhasana
- Setu Bandha
- Supta Virasana
- Urdhva Mukha Svanasana
- Virasana
Follow-up Poses- Dandasana
- Dhanurasana
- Sarvangasana
- Setu Bandha
- Sirsasana
- Urdhva Dhanurasana
- Virasana
Beginner's TipBeginners very often aren't able to touch their hands to their feet without straining their back or neck. First, try to turn your toes under and elevate your heels. If this doesn't work, the next thing to do is to rest each hand on a block. Position the blocks just outside each heel, and stand them at their highest height (usually about 9 inches). If you're still having difficulty, get a chair. Kneel for the pose with your back to the chair, with your calves and feet below the seat and the front edge of the seat touching your buttocks. Then lean back and bring your hands to the sides of the seat or high up on the front chair legs.
Benefits- Stretches the entire front of the body, the ankles, thighs and groins,
- Abdomen and chest, and throat
- Stretches the deep hip flexors (psoas)
- Strengthens back muscles
- Improves posture
- Stimulates the organs of the abdomen and neck
PartneringA partner can also help you work with your neck and head in this pose. Your partner should stand directly behind you as you perform Camel. Bring your head into a neutral position; that is, align your neck so it's neither in flexion nor extension. Have your partner support the back of your head with one hand, and press his other hand on your upper back, between the shoulder blades. He should pull the base of your skull away from the back of your neck and push your shoulder blades in the opposite direction, down the back. Let your neck grow between these two actions. Then, if you feel comfortable, have your partner carefully remove his hands and, maintaining the length in the back of your neck, drop your head back.
Source:
yogajournal.com