Wide-Legged Forward Bend 1
Equipment: no equipment
Fitness level: beginner
Category: Yoga
(pra-sa-REE-tah pah-doh-tahn-AHS-anna)
prasarita = stretched out, expanded, spread, with outstretched limbs
pada = foot
ut = intense
tan = to stretch or extend (compare the Latin verb tendere, “to stretch or extend”)
Step-by-Step Instructions
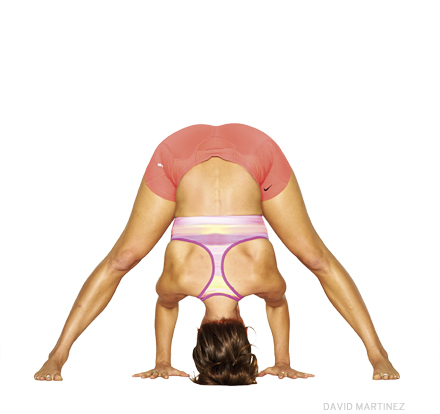
- Stand in Tadasana (Mountain Pose), facing one of the long edges of your sticky mat, then step or lightly hop your feet apart anywhere from 3 to 4 1/2 feet (depending on your height: taller people should step wider). Rest your hands on your hips. Make sure your inner feet are parallel to each other. Lift your inner arches by drawing up on the inner ankles, and press the outer edges of your feet and ball of the big toe firmly into the floor. Engage the thigh muscles by drawing them up. Inhale and lift your chest, making the front torso slightly longer than the back.
- Exhale and, maintaining the length of the front torso, lean the torso forward from the hip joints. As your torso approaches parallel to the floor, press your fingertips onto the floor directly below your shoulders. Extend your elbows fully. Your legs and arms then should be perpendicular to the floor and parallel to each other. Move your spine evenly into the back torso so that your back is slightly concave from the tailbone to the base of the skull. Bring your head up, keeping the back of the neck long, and direct your gaze upward toward the ceiling.
- Push your top thighs straight back to help lengthen the front torso, and draw the inner groins away from each other to widen the base of your pelvis. Take a few breaths. As you maintain the concavity of your back and the forward lift of your sternum, walk your fingertips between your feet. Take a few more breaths and then, with an exhalation, bend your elbows and lower your torso and head into a full forward bend. Make sure as you move down that you keep your front torso as long as possible. If possible rest the crown of your head on the floor.
- Press your inner palms actively into the floor, fingers pointing forward. If you have the flexibility to move your torso into a full forward bend, walk your hands back until your forearms are perpendicular to the floor and your upper arms parallel. Be sure to keep your arms parallel to each other and widen the shoulder blades across the back. Draw your shoulders away from your ears.
- Stay in the pose anywhere from 30 seconds to 1 minute. To come out, bring your hands back on the floor below your shoulders and lift and lengthen your front torso. Then with an inhalation, rest your hands on your hips, pull your tail bone down toward the floor, and swing the torso up. Walk or hop your feet back into Tadasana.
- Watch a video of Wide-Legged Forward Bend
POSE INFORMATIONSanskrit NamePrasarita Padottanasana
Contraindications and Cautions- Lower-back problems: Avoid the full forward bend
Modifications and PropsSome beginners aren't able to easily bring their hands to the floor and need a good deal of support in this forward bend to protect their lower back. Try raising your hands off the floor by resting each on the end of a block. If your back is still rounded, then use a folding chair to support your forearms. Always Remember in forward bends to emphasize the length of the front torso.
Deepen the PoseAdvanced students can get a better sense of how to work the arms in this pose by using a block. Set a block on one of its sides, with its long axis parallel to the long edge of your sticky mat, on the floor in front of you. Lean forward into the pose and grip the block between your forearms, just below the elbows, and pick it up off the floor. Then complete the pose with your palms and crown on the floor. Now squeeze the block firmly between your forearms, pressing your inner hands actively into the floor. This action of the arms will also get you ready for poses like Headstand variations and Pincha Mayurasana (Peacock Pose).
Theraputic Applications- Headache
- Fatigue
- Mild depression
Preparatory PosesPrasarita Padottanasana is usually sequenced near the end of a standing pose practice. Besides many of the standing poses, good preparations for this pose include:
Follow-up PosesBeginner's TipMost beginning students aren't able to easily touch the crown of their head to the floor in the last stage of this forward bend. Instead you can support your head on a padded block, a thickly folded blanket, or a bolster.
Benefits- Strengthens and stretches the inner and back legs and the spine
- Tones the abdominal organs
- Calms the brain
- Relieves mild backache
VariationsThe pose as described here is technically known as Prasarita Padottanasana I (in the Iyengar and Ashtanga systems). Prasarita Padottanasana II is a more challenging variation. Perform step 1 of the main description above. Then bring your hands into
Anjali Mudra (Salutation Seal), but behind your back, a hand position technically known as prstanjali mudra (prsta, pronounced prish-ta, meaning "the back or rear of anything"). To do this lean your torso slightly forward and round your back. Then press your palms together behind your back with your thumbs resting on your sacrum, fingers pointing toward the floor. Exhale and turn the fingers, first toward your back, then upward, so they point toward the ceiling. Slip the pinky sides of your hands up your back as high as possible, ideally between your shoulder blades. Roll your shoulders back and lift your chest, pressing the pinkies deeply into your spine. Finally exhale into your forward bend and bring your head close to or onto the floor. If this hand position isn't possible for you, simply cross your forearms behind your back and hold the elbows with the opposite hands.
Source:
yogajournal.com