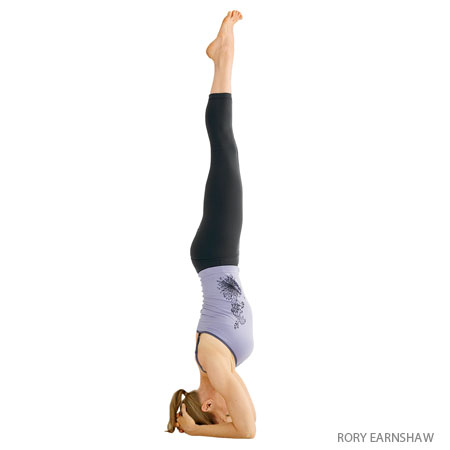
Supported Headstand
Equipment: no equipment
Fitness level: beginner
Category: Yoga
(sah-LOM-bah shear-SHAHS-anna)
salamba = with support (sa = with
alamba = support)
sirsa = head
Step-by-Step Instructions
- Use a folded blanket or sticky mat to pad your head and forearms. Kneel on the floor. Lace your fingers together and set the forearms on the floor, elbows at shoulder width. Roll the upper arms slightly outward, but press the inner wrists firmly into the floor. Set the crown of your head on the floor. If you are just beginning to practice this pose, press the bases of your palms together and snuggle the back of your head against the clasped hands. More experienced students can open their hands and place the back of the head into the open palms.
- Inhale and lift your knees off the floor. Carefully walk your feet closer to your elbows, heels elevated. Actively lift through the top thighs, forming an inverted “V.” Firm the shoulder blades against your back and lift them toward the tailbone so the front torso stays as long as possible. This should help prevent the weight of the shoulders collapsing onto your neck and head.
- Exhale and lift your feet away from the floor. Take both feet up at the same time, even if it means bending your knees and hopping lightly off the floor. As the legs (or thighs, if your knees are bent) rise to perpendicular to the floor, firm the tailbone against the back of the pelvis. Turn the upper thighs in slightly, and actively press the heels toward the ceiling (straightening the knees if you bent them to come up). The center of the arches should align over the center of the pelvis, which in turn should align over the crown of the head.
- Firm the outer arms inward, and soften the fingers. Continue to press the shoulder blades against the back, widen them, and draw them toward the tailbone. Keep the weight evenly balanced on the two forearms. It’s also essential that your tailbone continues to lift upward toward the heels. Once the backs of the legs are fully lengthened through the heels, maintain that length and press up through the balls of the big toes so the inner legs are slightly longer than the outer.
- As a beginning practitioner stay for 10 seconds. Gradually add 5 to 10 seconds onto your stay every day or so until you can comfortably hold the pose for 3 minutes. Then continue for 3 minutes each day for a week or two, until you feel relatively comfortable in the pose. Again gradually add 5 to 10 seconds onto your stay every day or so until you can comfortably hold the pose for 5 minutes. Come down with an exhalation, without losing the lift of the shoulder blades, with both feet touching the floor at the same time.
POSE INFORMATIONSanskrit NameSalamba Sirsasana
Contraindications and Cautions- Back injury
- Headache
- Heart condition
- High blood pressure
- Menstruation
- Neck injury
- Low blood pressure: Don't start practice with this pose
- Pregnancy: If you are experienced with this pose, you can continue to practice it late into pregnancy. However, don't take up the practice of Sirsasana after you become pregnant.
- Sirsasana is considered to be an intermediate to advanced pose. Do not perform this pose without sufficient prior experience or unless you have the supervision of an experienced teacher. Some schools of yoga recommend doing Sirsasana before Sarvangasana, others vice versa. The instruction here assumes the former order.
Modifications and PropsBalance in this pose is difficult at first. Perform Sirsasana against a wall. Bring the knuckles of the clasped hands to the wall. If possible, do the pose in the corner of a room, so that the right-angled walls touch your shoulders, hips, and outer heels.
Deepen the PoseCheck the position of the inner wrists in the pose. They tend to fall outward, shifting the weight onto the outer forearms. Turn the pinkies away from the back of your head, and bring the inner wrists perpendicular to the floor. As you firm the outer upper arms inward, press the wrists actively into the floor.
Preparatory PosesFollow-up PosesBeginner's TipBeginners tend to take too much weight onto the neck and head when coming into and exiting this pose, a potentially harmful situation. Prepare to do this pose as described above against a wall. To come up, set your arms in place and lift your head slightly off the floor. Move into the wall-supported position with the head off the floor, then lower it lightly onto the floor. Support 90 to 95 percent of your weight on your shoulders and arms, even if it means staying for only a few seconds. Gradually, over time, take more and more weight onto your head, but proceed slowly. Similarly, when you exit this pose, first lift your head off the floor, then bring your feet down. Eventually you will be able to keep your head on the floor when going up and coming down.
Benefits- Calms the brain and helps relieve stress and mild depression
- Stimulates the pituitary and pineal glands
- Strengthens the arms, legs, and spine
- Strengthens the lungs
- Tones the abdominal organs
- Improves digestion
- Helps relieve the symptoms of menopause
- Therapeutic for asthma, infertility, insomnia, and sinusitis
PartneringA partner can help you with your alignment in this pose. Have your partner stand to one side and look at the major alignment "landmarks" along the side of your body: the outer ankle bone, the center of the hip, the center of the shoulder, and the ear hole. These points should all be in one line perpendicular to the floor.
VariationsOne of the simplest Sirsasana variations is called Eka Pada Sirsasana (pronounced ACHE-ah PAH-dah,
eka = one,
pada = foot or leg). Come into the pose. Stabilize your left leg perpendicular to the floor. Exhale and lower your right leg parallel to the floor without disturbing the position of the left. The outer hip of the down leg (in this case, the right) tends to sink toward the floor. To correct this, turn the right leg outward, moving its sitting bone toward the left. Hold the two sitting bones close and rotate (from the hip joint only) the right leg back to neutral. Hold for 10 to 30 seconds, inhale the right leg back to perpendicular, and repeat on the left for the same length of time.
Source:
yogajournal.com